What if you could wake up every morning to a curated newsletter, written just for you by an AI that understands your interests? That’s what I built using N8N’s AI agent capabilities. In this guide, I’ll show you how to create your own research assistant that reads the internet, thinks about what matters to you, and delivers personalized insights to your inbox.
What is an AI Agent?
An AI agent is fundamentally different from a simple automation script. While traditional workflows follow rigid, pre-programmed steps, an AI agent is an autonomous system that can perceive its environment, make decisions, and take actions to achieve specific goals. It combines three key capabilities:
- Perception: Understanding and processing input data from its environment
- Reasoning: Making intelligent decisions based on available information and defined objectives
- Action: Using available tools and resources to accomplish tasks autonomously
Unlike basic automation that executes “if-this-then-that” logic, AI agents adapt their behavior based on context, learn from interactions, and make nuanced decisions that would typically require human judgment.
Why This Agent?
Imagine waking up every morning to a personalized newsletter crafted for you—not by a human editor who doesn’t know your interests, but by an AI that understands what fascinates you about technology, health, and innovation. This agent represents the future of personalized content: intelligent systems that can read, understand, and synthesize information like a research assistant.
This AI agent showcases what’s possible with modern AI:
- Real Understanding: It doesn’t just match keywords—it reads full articles and grasps context, nuance, and significance
- Personal Intelligence: It learns your interests and adapts its selections to match your curiosity and professional needs
- Creative Synthesis: It connects ideas across different sources, finding patterns and insights you might miss
This isn’t just automation—it’s having a personal AI researcher who knows your mind and brings you compelling ideas from across the internet.
Why N8N?
N8N works well for building AI agents because it combines visual workflow design with AI capabilities:
Visual Agent Architecture: N8N’s node-based interface makes complex agent logic understandable. You can see how data flows from perception (RSS feeds) through reasoning (AI processing) to action (email delivery).
Native AI Integration: Built-in support for AI agents, multiple LLM providers, and AI tools means you’re not cobbling together separate services—everything works within one platform.
Tool Ecosystem: Large library of pre-built integrations (Gmail, HTTP requests, data processing) that work as the agent’s “hands and eyes” in the digital world.
Flexibility: Whether you want cloud hosting or self-hosting control, N8N adapts to your needs while maintaining the same agent capabilities.
How It Works
Prerequisites
Before we dive in, you’ll need:
- An N8N account (cloud or self-hosted)
- Google account (for sending emails via Gmail). This is a tricky step that requires a certain degree of Google Cloud Knowledge. Thankfully, N8N has great documentation for setting up OAuth.
- Google Gemini API key. Get one from AI Studio
- Basic understanding of workflow automation concepts
Getting Started
Here’s what our complete AI agent workflow looks like in N8N:
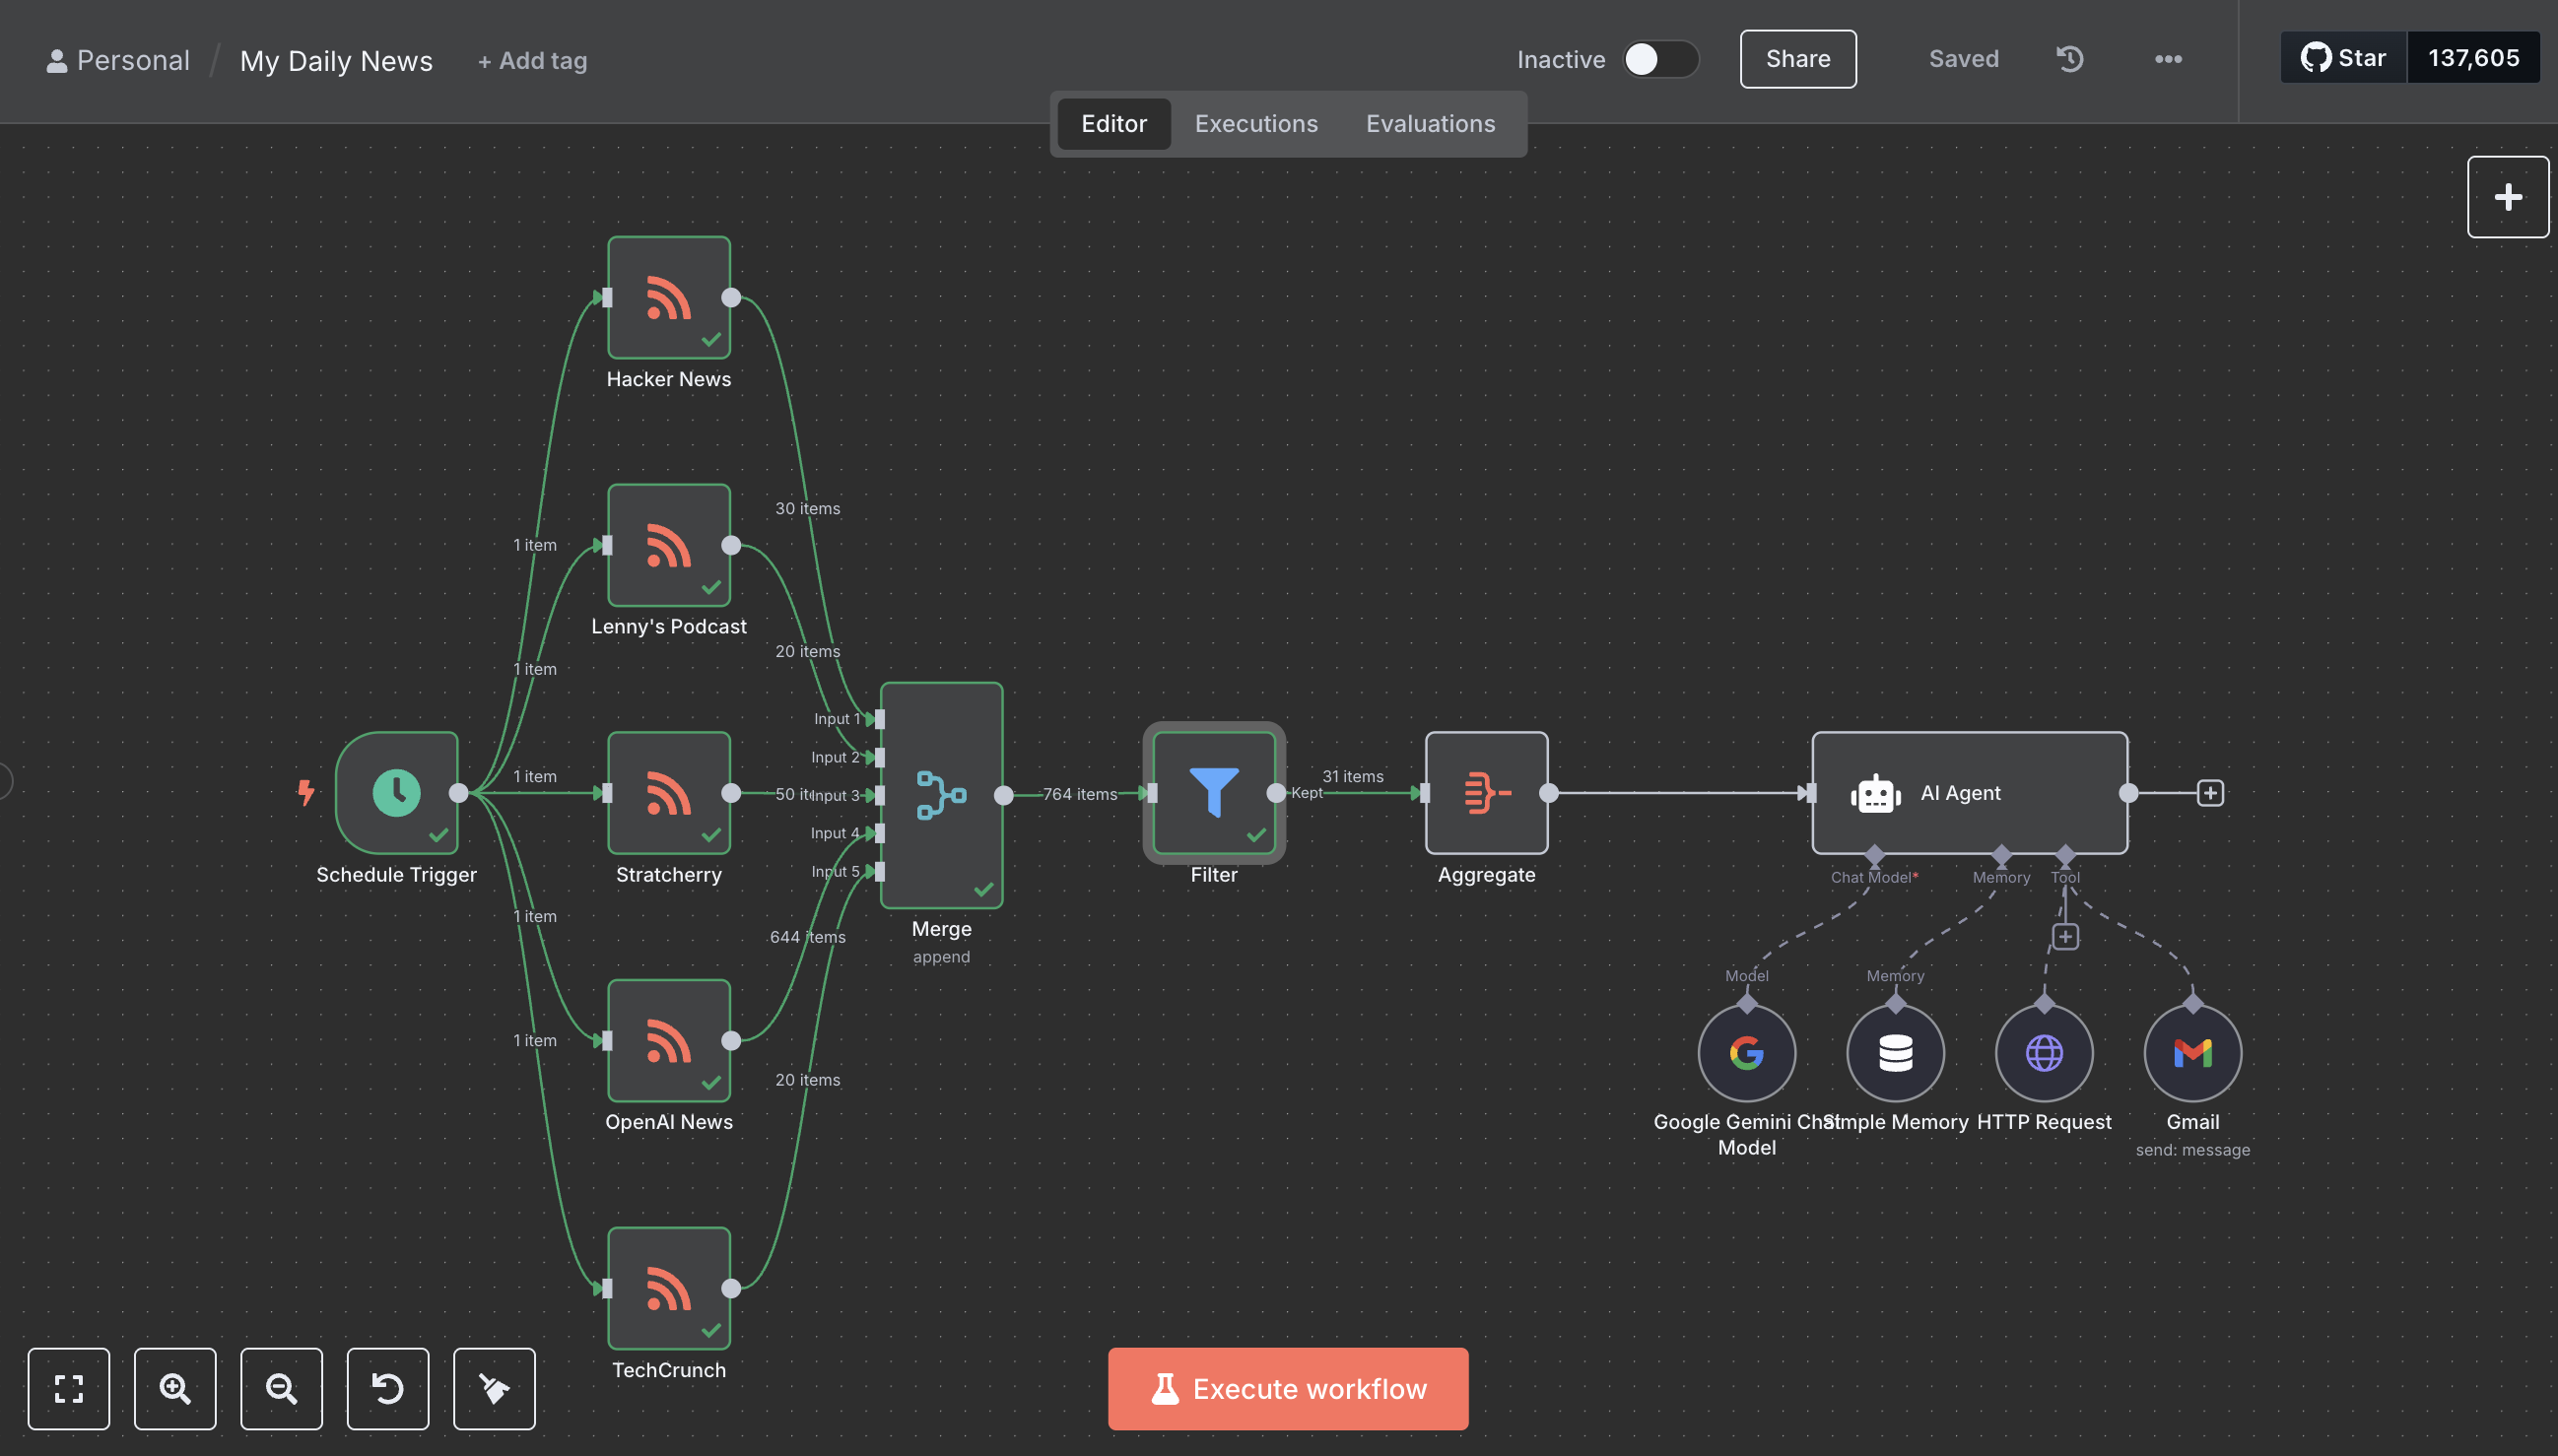
This visual workflow shows how data flows from RSS feeds through filtering and aggregation to the AI agent, which then uses various tools to read articles, analyze content, and send personalized emails.
Step 1: Setting Up Your N8N Workspace
First, let’s get familiar with N8N’s interface. If you’re new to N8N, I recommend starting with their quickstart guide.
Create a new workflow and we’ll build this step by step. N8N uses a visual node-based approach where each node represents a specific action or data source.
Step 2: Creating the Data Sources (RSS Feeds)
We’ll start by setting up multiple RSS feed readers to gather content from various sources.
Adding RSS Feed Nodes
-
Add the Schedule Trigger: This will run your agent automatically every morning
- Drag the “Schedule Trigger” node onto the canvas
- Set it to run daily at 9:00 AM
- This ensures you wake up to fresh insights every day
-
Add RSS Feed Read Nodes: We’ll create five diverse content sources, each representing a different type of information:
- Hacker News:
https://news.ycombinator.com/rss(Community-driven tech discussions) - Lenny’s Newsletter:
https://www.lennysnewsletter.com/feed(Podcast/Newsletter content) - Stratechery: Your premium RSS URL (Deep research and analysis)
- OpenAI News:
https://openai.com/news/rss.xml(Company blog updates) - TechCrunch:
https://techcrunch.com/feed/(Media and news coverage)
- Hacker News:
For each RSS node:
- Search for “RSS Feed Read” in the node panel
- Configure the URL parameter with your chosen RSS feed
- Connect each RSS node to the Schedule Trigger
Pro tip: You can find more RSS feeds by looking for the RSS icon on your favorite websites or checking their /feed or /rss endpoints.
Step 3: Merging and Filtering Data
Combining Multiple Data Sources
Add a Merge node to combine all RSS feeds:
- Set “Number of Inputs” to 5 (matching our RSS sources)
- Connect all five RSS nodes to this merge node
- This creates a single stream of all articles from diverse content types
Filtering Recent Content
Add a Filter node to only process recent articles:
- Connect it after the Merge node
- Set up a condition:
pubDate>yesterday - This ensures we only process articles from the last 24 hours
The filter uses N8N’s built-in date functions. You can learn more about filtering in the official Filter node documentation.
Step 4: Aggregating Data for AI Processing
Add an Aggregate node:
- Select “Aggregate All Item Data”
- This bundles all filtered articles into a single data object
- The AI agent needs this format to process multiple articles at once
Step 5: Setting Up the AI Agent (The Brain)
This is where we transform a simple workflow into an intelligent agent. The AI Agent node is the reasoning engine that will perceive the RSS data, make decisions about content relevance, and orchestrate actions using the available tools.
The Power of Prompts
The intelligence of our agent comes from two prompts that define its personality, goals, and behavior. Think of these as the agent’s “DNA”—they determine how it thinks, what it values, and how it communicates.
Configuring the AI Agent
- Add the AI Agent node from the AI section
- Set the Prompt Type to “Define”
- Configure the User Prompt (the task instructions):
Your goal is to send me a curated, summarised email with only the most valuable content. Below are the steps

Input Data: {{ JSON.stringify($json.data) }}

1. Read each URL in the input data using the HTTP tool.
2. Evaluate the content and select only 3-7 articles that are most relevant to my interests
3. For selected articles, create compelling summaries that explain why each is worth reading
4. Organize the content by topic or theme when possible
5. Finally, send one email that is nicely formatted with HTML using the gmail tool- Configure the System Message (the agent’s personality and context):
You are my executive assistant and researcher who is scanning the internet to identify topics that match my interest and send me an email once a day with things I should read.

Topics that are of my interest currently include:
1. Artificial Intelligence
2. Health & Longevity
3. Latest advancements in technology

Your job is to be selective and intelligent about what you include. From the list of articles provided:
- Only select articles that are highly relevant to my interests
- Prioritize unique insights, breaking news, or deep analysis
- Avoid duplicate or similar content
- Aim for 3-7 high-quality articles rather than overwhelming me with everything

1. Read each URL in the input data using the HTTP tool
2. Evaluate and select only the most relevant and valuable articles
3. Summarise & aggregate using the Gemini Tool, explaining why each article is worth reading
4. Send one final email as nicely formatted HTML using the gmail tool
Understanding the Prompt Architecture
These two prompts work together to create the agent’s intelligence:
System Message Role: This is the agent’s core identity and worldview. It defines:
- Who the agent is (executive assistant and researcher)
- What it cares about (your specific interests)
- How it should behave (selective, intelligent, quality-focused)
- Its decision-making criteria (relevance, uniqueness, depth)
User Prompt Role: This provides the specific task and execution steps:
- The immediate goal (curated email)
- The data context (RSS articles)
- The step-by-step process (read, evaluate, summarize, send)
- Success criteria (3-7 high-quality articles)
These prompts transform a generic AI model into your personal research assistant with specific knowledge, preferences, and working style.
Agent Intelligence in Action
Here’s where you can see the three agent capabilities working together. Your RSS feeds might return 50+ articles daily, but the agent’s reasoning engine intelligently curates only what matters:
Perception Layer: The agent processes articles from five distinct content types—community discussions (HN), podcast insights (Lenny’s), deep research (Stratechery), company updates (OpenAI), and media coverage (TechCrunch)—using HTTP tools to read full content and understand context.
Reasoning Layer: Armed with your defined interests (AI, Health & Longevity, Tech advancements), the agent evaluates each piece of content by:
- Assessing topical relevance against your interests
- Evaluating content depth and uniqueness across different source types
- Considering source credibility and the value of diverse perspectives
- Identifying connections between community discussions, research, and news coverage
Action Layer: Based on its reasoning, the agent takes targeted actions:
- Selects only the most valuable 3-7 articles from across all content types
- Synthesizes insights that span community sentiment, expert analysis, and breaking news
- Composes personalized summaries explaining why each piece matters
- Delivers a cohesive email digest that represents the full spectrum of tech discourse
Adaptive Behavior: Through the memory component, the agent learns from previous decisions, improving its understanding of what you find valuable—autonomous behavior that evolves over time.
An AI agent goes beyond simple automation, making intelligent decisions that adapt to your preferences and the changing information landscape.
Step 6: Adding AI Tools and Memory
The AI Agent needs tools to perform its tasks. We’ll add these sub-nodes:
Google Gemini Chat Model
- Add the “Google Gemini Chat Model” node
- Configure with your Gemini API key
- Set model to “models/gemini-2.5-flash”
- Connect to the AI Agent’s language model input
HTTP Request Tool
- This allows the AI to read web pages
- Configure it to return HTML content
- The AI will automatically determine URLs to fetch
Gmail Tool
- Set your email address as the recipient
- Configure Gmail OAuth2 credentials
- The AI will compose and send formatted emails
Simple Memory
- Add a “Simple Memory” node for conversation context
- Set session ID to
{{ $workflow.id }}_{{ $execution }} - This helps the AI remember previous interactions
Step 7: Connecting Everything Together
The connections are important for proper data flow:
- Schedule Trigger → All five RSS nodes
- All RSS nodes → Merge node
- Merge → Filter → Aggregate → AI Agent
- HTTP Request and Gmail tools connect to AI Agent as “ai_tool” connections
- Gemini model connects as “ai_languageModel”
- Memory connects as “ai_memory”
Step 8: Setting Up Credentials
You’ll need to configure several API connections:
Google Services
- Gmail OAuth2: For sending emails
- Google Gemini API: For AI processing
Step 9: Testing and Activation
- Save your workflow
- Test manually by clicking “Execute workflow” to verify everything works
- Monitor the execution in real-time to see your agent in action
- Check your email for the generated digest
- Enable the workflow so it runs automatically at 9 AM daily
Your agent is now live! Every morning at 9 AM, it will:
- Scan your RSS feeds for new content
- Read and analyze articles
- Select the most relevant pieces
- Compose your personalized newsletter
- Deliver it straight to your inbox
No more manual work—just wake up to fresh insights curated specifically for you.
Troubleshooting Common Issues
API Rate Limits
- Add delays between HTTP requests
- Use error handling nodes for graceful failures
Content Quality
- Adjust the AI prompt for better summaries
- Add content filtering for relevance
What’s Next?
This agent is just the beginning of what’s possible with personalized AI. You could extend it to:
- Create multiple specialized agents for different interests (work, hobbies, research)
- Add personality and writing style preferences to make it feel even more personal
- Include multimedia content analysis for videos and podcasts
- Build conversation capabilities so you can discuss articles with your agent
- Connect it to your calendar and tasks to suggest relevant reading based on your schedule
Key Takeaways
Building AI agents with N8N opens up possibilities for personalized AI experiences. We’ve created something that feels magical—an AI that understands your interests and crafts content for you. The visual workflow approach makes these AI capabilities accessible to anyone curious enough to experiment.
What excites me most about this project isn’t the technical implementation—it’s the glimpse into a future where AI serves our individual needs and curiosities. This agent doesn’t just filter information; it develops understanding of what fascinates you, connects ideas across different domains, and presents insights in a way that feels personally meaningful.
This represents the democratization of personalized AI: the ability to create intelligent systems that adapt to your unique perspective and interests, delivering experiences that feel crafted just for you.
Ready to build your own AI agent? Start with N8N’s AI Starter Kit and experiment with the concepts we’ve covered here.
Have you built similar automation workflows? I’d love to hear about your experiences and creative use cases in the comments below.